|
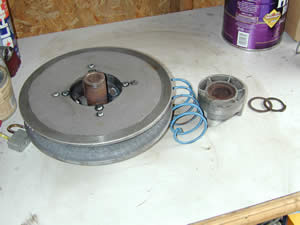
Secondary Clutch
The secondary is usually really easy to
service, so there isn't much reason to avoid it. Most of the
time it comes off with one bolt, and it is easy to get to. As
far as tools, the only specialty tool you will likely need is
a large reversible snap ring pliers. These are available at any
auto parts store for under $10.
|
Assuming that you read "How to change
a belt in under a minute" last year, you should be able
to peel the belt right off and you are ready to pull the clutch.
A single bolt on the side of the clutch secures it to the cross
shaft. Hit the brakes and remove the bolt. The clutch should
slide right off of the shaft.
As long as you are right there, clean the
shaft and apply a fresh light coat of Never-seize. If it is rusty,
use a wire wheel to clean it up first. This will assure that
the clutch will come off next time too. Also take a look at the
cross shaft bearing. They are easy to check and replace, and
they take a lot of abuse, so they need occasional replacement.
I will cover more about bearings later in the report. |
|
|
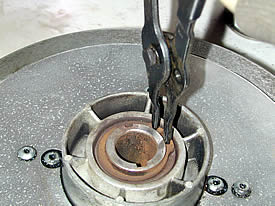
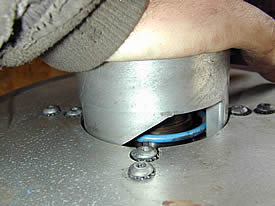
Once you have the clutch off and up on the
bench, get your snap ring pliers out and remove the ring. A good
quality, properly sized snap ring pliers will save a lot of frustration
here. Just buy the right tool, it is $10 or less. Wear safety
glasses, these rings, or parts of them, can fly forcefully. |
 |
|
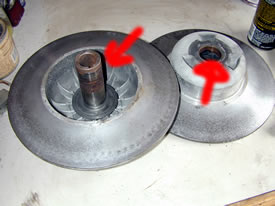
Once you remove the snap ring, the helix should
pop out under the pressure from the spring. Keep a hand on the
helix to make sure it is a controlled process. |
|
|
The helix is one of the keys to the secondary
clutch. Check the ramps for wear and scoring as well as the inner
bore and bushing surfaces. This one shows minor wear considering
I put it in 3,600 miles ago. I cleaned and degreased everything,
and polished the ramps and bushing surfaces.
The helix and bushings were intended to
be run dry. Putting grease or oil on here seems like a natural,
but it is not what you want. Dirt gets into the grease, and it
becomes an abrasive paste accelerating wear. |
 |
|
Check all of the surfaces that run against
a bushing and the ramps. If there is light corrosion you can
wire wheel it or use 600 or 1000 grit sandpaper to polish it
up. If it is too bad or worn, replace the helix. I have seen
multi angle helixes as cheap as $35. |
 |
|
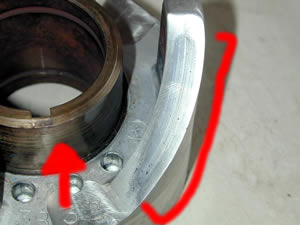
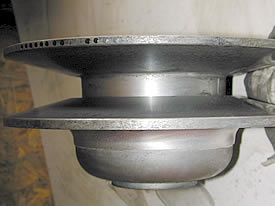
After checking over the helixes, I took a
look at the sheaves. The center post needed a little clean and
polishing and a cleaning and check of the bushing that runs on
it. |
 |
The belt surfaces showed some corrosion,
but I didn't spend too much time on that. You can polish the
sheaves up to keep them from getting too rough, and the belt
will clean that up in the first 5 miles.
In this case, the sled has seen 4 summers
of outside storage, and corrosion is on everything. I have been
cleaning everything as I go, and I have a rag with a combination
of synthetic waterproof grease and carb cleaner on it. It leaves
a protective film without leaving everything greasy or prone
to attract dirt.
All of the parts got cleaned with carb
cleaner and compressed air and hit with the protective film.
|
Inside the sheave that houses the helix, there
are two more bushings to clean and inspect, and the buttons that
run on the helix. I checked for abnormal wear on the bushings
to see if it is side loading and the buttons get a look too.
Buttons are cheap, replace them if you are inside the clutch
and they show wear. |
 |
|
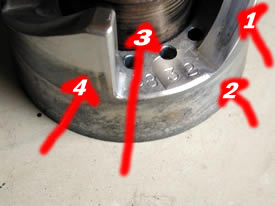
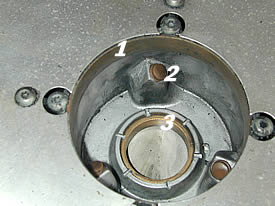
Once everything is cleaned up, I put the two
sheaves back together and check a few things. The first is to
check the bushings to see if they feel sloppy. The second is
to check that the sheaves can turn and spread without binding.
You are checking bushing #3 in the picture above. |
 |
|
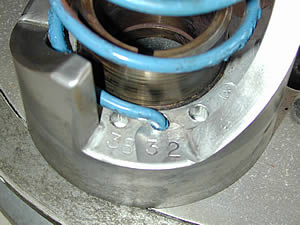
What hole do I put the spring in? There should
be wear in the one that it was in. You can chose a different
hole if you want to change backshift and upshift characteristics
of the clutch. |
 |
You will want to check your spring for
warping and general fatigue. If it feels weak, it probably is.
It was the source of a lot of boggy sleds when I was servicing
them. Again, springs are fairly cheap, and if yours is worn,
an new one will make a night and day difference in your sled's
performance. I also know that one of the Minnesota brands had
a batch of weak springs in the early-mid-90s, and there was a
service bulletin on them. It was a standard procedure to check
them as described below, and it only takes a minute.
|
As you reassemble the helix, you will have
some pushing and turning to do. Push the helix part way down
and turn it to tighten the spring until the buttons ride the
next set of ramps, then push down and clip it. That preloads
the clutch spring. Double check the clip to make sure it is fully
seated in the groove. It is easy to not have it in all of the
way if the spring pressure is on it when it is installed. |
 |
Roller secondaries are a little different
in configuration, but the procedure is similar. Pull it apart,
clean it up, and check the helix ramps, bushing surfaces and
rollers for wear.
So, I have checked out the cross shaft
bearing, cleaned up the shaft and never seized it, and mounted
the clutch back on the shaft. Before I put the belt back on,
one more test. This tip alone is worth reading the whole page.
Turn the clutch so that the balancing holes
are up. Locate a drill bit about the right size, and put the
chuck end in one of the balance holes. Take a fish scale and
hook it to the bottom of the drill bit, hold the other sheave
and pull. The clutch sheave should not turn before about 12 pounds.
Don't go too high on the drill bit, the extra leverage will give
a false reading. This is an easy test and an important one. A
weak secondary spring will make your sled a real pooch.
|
Bearings
Bearings are the unsung heroes
of the snowmobile world. There are a pile of them in the suspension,
chain case, and drive train. A quick count on my sled comes to
16 bearings. Most of the time, they are not even a consideration
until they break. Melting down a back axle or a drive shaft bearing
will end a snowmobiling weekend early and cost money.
Long time visitors to this page
know I advocate using dealer oil and belts. I only run NGK plus.
When it comes to bearings I part company with that philosophy.
By reading the number on the bearing, usually you can get a replacement
bearing from a local bearing dealer. Many times it will be the
exact same manufacturer and part number bearing $10 cheaper.
The common bearing on my sled was about $8.50 at the bearing
shop and $18 at the dealer for the exact same part from the same
maker. There are some proprietary bearings, but usually not many.
Most of the time the manufacturer buys the bearings from a supplier.
|
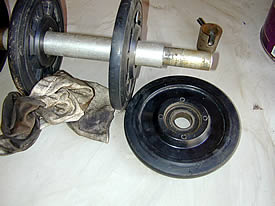
Bearings, like the secondary clutch are not
that hard to service once you get them on the bench. In this
case, the back axle was in the way, so I serviced it and put
it in the finished box. The wheels were ok and didn't show damage,
but the bearings were unhappy. |
 |
|
On my rear axle wheels there was a common
bearing held in by a circlip. I used a snap ring pliers to remove
this, and drove the bearing out with the right sized socket.
You only want to pound on the outer diameter of the bearing or
you will damage it. The inner race was not made to take sharp
blows from the side, and the oil seal is delicate and easily
damaged. |
 |
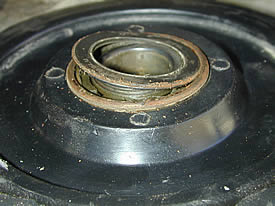
I popped open one of the oil
seals and took a look at the bearings. They were pretty ugly
and needed service. I very seriously doubt that these would have
made it through the winter.
 .
. . . . . . . . . . . .
. . . . . . . . . . . 
|
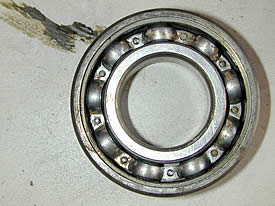
After pulling both oil seals, repeatedly washing
them with solvent and blowing them out with compressed air, the
actual bearing emerged. I checked it for roughness and vertical
and lateral play and decided I could get by with cleaning and
repacking them. New ones would have been about $35 for the 4,
not bad, so had they shown much wear at all, they would have
been replaced. |
 |
If you repack or grease the
bearings, use good grease. White lithium is ok on the Lawn Boy,
but not here. I use a water resistant synthetic extreme pressure
bearing grease for this. Anything less might not stand up to
the high speed, snow, water, and abuse. A tube of the good stuff
is $6.50-$10 pretty easy, but is an investment in the longevity
and reliability of your sled.
Total time spent on this project
was about an hour and a half at a leisurely pace. Both the clutch
and axle were out and on the bench, so that doesn't include R&R
time. (Removal and Replacement).
That is about it for the tech
stuff for today. There will be more coming soon as I progress
through the sled. Be sure to check out last year's tech page,
how to change a belt in under a minute. It is a good technique.
Thank you for visiting the Northern
Destinations Tech pages! |
|

